Friday 23 July 2010

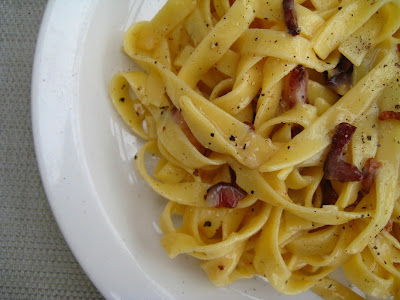
Tagliatelle alla Carbonara


Dieters look away! With its full-fat, calorie-laden combination of white carbs tossed with bacon fried in butter swirled with a creamy cheesy sauce, carbonara is the dish to expand waistlines if ever there was one.

For the rest of us who choose not to care however, it is a devilishly easy-to-make, uncomplicated plate of luscious goodness that epitomises the gorgeous simplicity and flavour of Italian cuisine. Did you know that truly authentic carbonara made the proper way actually contains no cream, but achieves its richness from beaten eggs and melted parmesan? No complex sauce made separately either- the raw eggs and cheese are simply tossed with freshly cooked hot pasta to cook in its residual heat.

Traditionally only egg yolks are used, but my dislike for wastage means that the recipe below includes the whites as well. Thick long varieties such as tagliatelle, fettucine, linguine or spaghetti are particularly well-suited for this sinfully luscious dish, but feel free to use whatever pasta you desire.

For convenience' sake, the quantities listed are for one relatively hungry person- increase and multiply as needed.

Tagliatelle alla Carbonara
Serves 1

In a small bowl, whisk together 1 egg with about ½ cup grated Parmigiano Reggiano/ Pecorino Romano (parmesan). Set aside.


Boil 100g tagliatelle/fettucine/spaghetti (I used dried- if using fresh cook for a shorter time) in salted water for 10-15 mins or until al dente.

Meanwhile, fry 50g chopped pancetta/bacon in 1 tsp butter and some extra virgin olive oil until browned.


Drain the pasta. Chuck it in a large pot/bowl and toss immediately whilst hot with the egg cheese mix and cooked bacon (along with some of its buttery oily juices!). Season well with a touch of salt (not too much as the bacon is already salty) and freshly ground black pepper. Cover and leave to sit for 5-10 mins to cook in its own residual heat.

Garnish with chopped parsley or a sprinkle of grated Parmesan if desired and serve.

Monday 12 July 2010

Smooth Homemade Lime Sorbet (Without An Ice Cream Maker)

SAM TAN'S KITCHEN HAS MOVED! Please visit the new website/online store at www.samtanskitchen.com. You can also follow Sam on InstagramFacebook and Twitter. Thank you!


The perfect zesty lift to zing you up and cool you down this sweltering summer, the following recipe is ludicrously easy and just requires some patience and time as you freeze-blend-refreeze several times. The end result though, is well worth the wait- a smooth, soft, tart, beautifully refreshing sorbet made WITHOUT a special ice cream machine, guaranteed to impress! :)

One whisked egg white makes all the difference, the essential ingredient that gives this frozen dessert the body and silkiness it needs.

Make at least 12 hours before you intend to eat it- if it seems too hard, leave at room temperature for 5 mins before scooping. Serve immediately as it melts rapidly.


Smooth Homemade Lime Sorbet (Without An Ice Cream Maker)
Makes about 1 litre

Stir together and dissolve over medium heat to form a thin sugar syrup:
500ml (2 cups) water
250g sugar

Let cool, then stir in the juice and zest of 6 large limes.

In a separate large bowl with an electric mixer, whisk 1 large egg white until a stiff meringue (ensure the bowl and whisk are clean and dry). Pour in the lime syrup liquid and continue whisking until the egg whites are incorporated (they may float to the top- don't worry as you will be stirring it again once frozen).

Chuck into a container and put in the freezer. After about 3 hours, scrape down the frozen sides and stir thoroughly with a metal spoon. Refreeze for another 3 hours.

Remove and pour the entire contents into a juice blender (an electric whisk doesn't make it smooth enough in my opinion). Blend until very smooth- depending on your blender, you may need to do it in small batches or use a spoon to push down the sides to get the icy mixture moving (be careful not to touch the moving blades). Pour back into the container and freeze until firm.

Scoop and decorate with lime zest or some mint leaves if desired. Eat immediately.

Saturday 3 July 2010

Grilled Sweet Miso Salmon with Ginger

An easy-peasy Japanesey dish if ever there was one, and very good for you too! :)

Grilled Sweet Miso Salmon with Ginger
Serves 4

Rinse and pat dry 4 medium skin-on salmon fillets.

Stir together in a bowl and spread all over the fish:
3 tbsp white miso paste
2 tbsp honey
1" fresh ginger, minced
1 tbsp sake
Dash of rice vinegar
Dash of sesame oil

*I leave out soy sauce and salt as the miso paste is already salty

White miso paste

Stirring the ginger into the marinade

The coated fillets

Place in fridge to marinate at least half an hour (the longer the better).

To cook, arrange the fillets skin side down on a foil-lined tray and place under an oven grill at 180 C for about 5-8 mins. Flip over and continue grilling a further 5-10 mins or until the skin turns crispy and caramelises.

Garnish with a sprinkling of toasted sesame seeds, and serve immediately alongside some hot rice and steamed vegetables.