Monday, 1 November 2010

Kabocha Korokke (Japanese Pumpkin Croquettes)

SAM TAN'S KITCHEN HAS MOVED! Please visit the new website/online store at www.samtanskitchen.com. You can also follow Sam on InstagramFacebook and Twitter. Thank you!


OK, so strictly speaking I can't call this recipe kabocha korroke as I didn't actually have any of those beautiful deep green Kabocha squashes (or Japanese pumpkins) on hand. Instead, I massacred poor Count Pumpkula instead- our Halloween pumpkin vampire which no longer had a purpose in life beyond October 31st.

The late Count Pumpkula, serving us well in life and in death. Or is that undeath?

The Kabocha squash you're meant to be using for this recipe

Kabocha squashes have an exceptional intense sweetness like a cross between sweet potato and butternut squash, so a few adjustments were necessary to get the far more watery, inferiorly flavoured regular pumpkin to taste the same. If you have a proper Kabocha on hand, the sieving step won't be necessary as it won't be that wet, and you can omit the sugar and flour in the mash.

Kabocha Korokke (Japanese Pumpkin Croquettes)
Makes about 10 small pieces

Cut half a small Kabocha pumpkin into small chunks- leave the skin on so you get pretty green bits in your croquettes. Boil for about 20 mins in salted water (or some people use chicken broth) until tender and cooked. Drain thoroughly, then mash and set aside to cool.
If using regular pumpkin instead of Kabocha, drain it again
once mashed by pressing through a fine sieve.

Finely chop half a small onion and fry for a few minutes in a bit of oil or butter over medium heat until translucent. Stir it into the mashed pumpkin along with:

2 tbsp light soy sauce
½ tsp salt
A generous dash of white pepper
1 tbsp flour (if using normal pumpkin)
1 tbsp sugar (if using normal pumpkin)

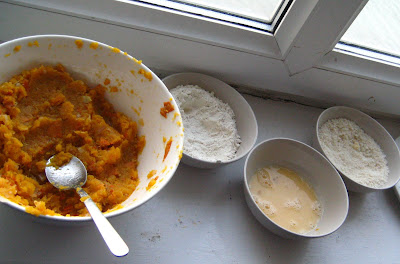
Place 1 cup flour, 1 extra large whisked egg and 1 ½ cups panko
(Japanese breadcrumbs) in 3 separate bowls.


Panko- lighter, flakier and crisper than normal breadcrumbs,
commonly found in Asian shops

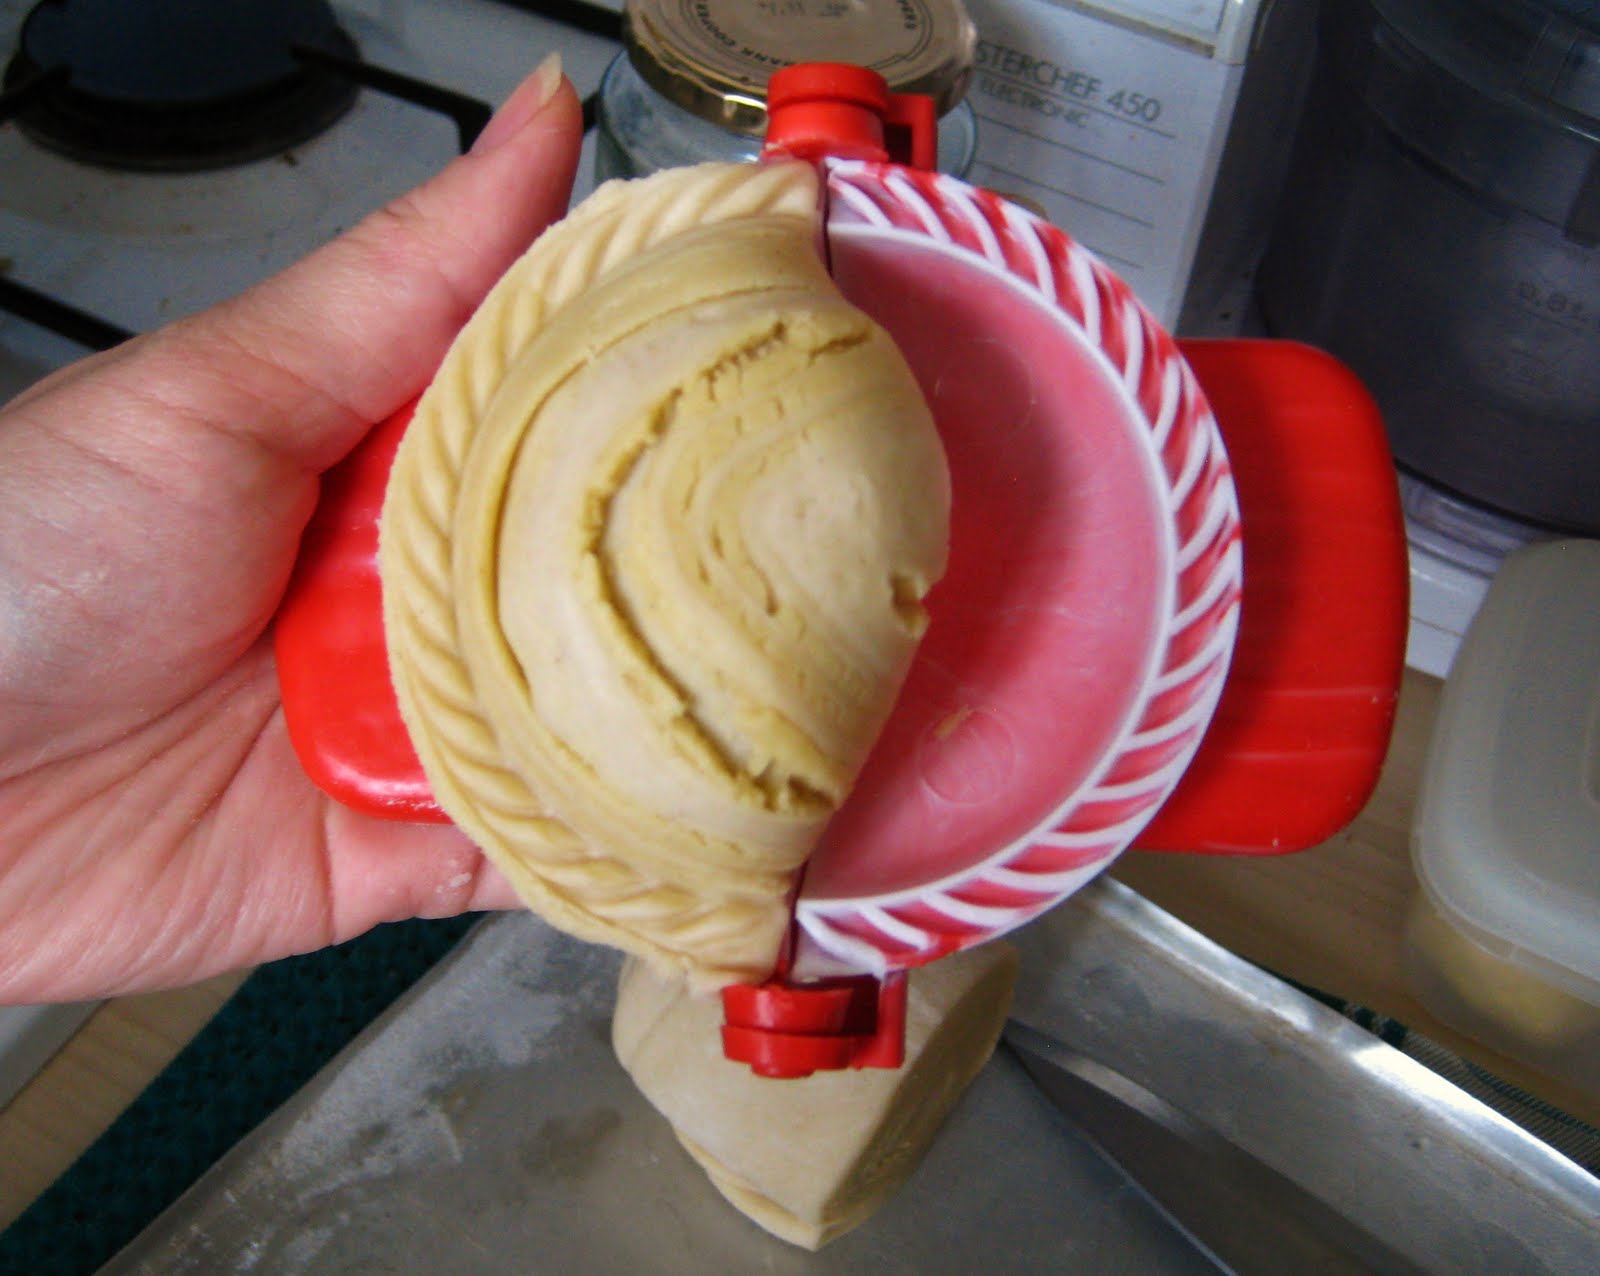
Shape the pumpkin mash into croquette patties with two large spoons.

Dip each pattie in flour...

...then in egg...

...then in panko breadcrumbs.


Deep fry a few croquettes at a time until brown and crisp, turning several times with a pair of long wooden chopsticks. Remove and drain on paper towels.

Let cool for a few minutes so you don't burn your tongue. Drizzle with a bit of fruity tonkatsu sauce if desired, then crunch away!


Friday, 22 October 2010

Choy Sum (Chinese Flowering Cabbage) with Garlic Oil and Oyster Sauce

Healthy instant fast-food: that's what this is.

So simple and quick that I think it barely qualifies as a recipe, this classic Chinese method of preparing leafy greens not only takes all of two minutes (20 seconds if you already have garlic oil on hand!) but provides pure unadulterated deliciousness in a prettily-coloured package bursting with nutrition, all with only three ingredients. Here, less is really much more :)

To non-Chinese speakers, choy sum is also known as "Chinese flowering cabbage" and typically features crunchy green stalks, thick green leaves and little yellow flowers. You may freely use pak choi/bok choy (similar to choy sum but with fatter whiter stalks), kai lan (Chinese broccoli/kale with thicker stems) or any other variety of leafy Chinese greens if preferred. My little Paint image below might help you distinguish them better than I can explain (pictures compiled from Google-no copyright infringement intended, sorry if they belong to anyone!):


Come to think of it, garlic oil and oyster sauce taste good on most vegetables so I wouldn't hesitate to drizzle them on Western broccoli or beans too. Who says instant meals can't be good for you!

Choy Sum with Garlic Oil & Oyster Sauce
Serves... well, about 2 I think? Quantities provided totally not set in stone :)


Finely mince 2 cloves garlic and stir-fry over medium heat in about 1 tbsp oil until golden brown and crisp. Dish out and set aside.

*If desired you can make a huge batch of this at one go, and store in a jar for future use. It's fragrant and so delicious as a simple drizzle on vegetables!

Trim the stems of 3-4 large bunches of choy sum, slice into two (for easier eating) and wash thoroughly. Bring a pot of water to boil and chuck your vegetables in to blanch for about 20 seconds (not minutes)- DO NOT OVERCOOK! The leaves should only be wilted ever so slightly, with their strong bright green hue still intact.

Drain completely, arrange on a plate and drizzle with oyster sauce (if you're vegetarian, you can find varieties made with mushroom extract) and garlic oil.

TA-DAA, DONE! :) Serve immediately with hot steamed rice.

*If preferred, feel free to steam for a few minutes instead of blanching- it takes a tad longer but preserves even more nutrients.


Tuesday, 12 October 2010

Penang Char Kuay Teow (Stir-Fried Flat Rice Noodles)


I initially blogged a version of this sinful Malaysian favourite, most famously from the island of Penang, back in April 2009. Since then, after some extensive R&D (by that I mean making Arivind my taste test guinea pig until he gives it the thumbs up) we have decided that you should ignore the old one and use This Perfected Recipe instead!

Truthfully the only change is that the seasoning has been tweaked to contain both dark and light soy sauce in 3:1 proportions, as well as a touch of sugar. The literal meaning of "char" in Chinese is to stir-fry briskly over high heat (in this case until it is actually "charred" as it means in English), so the crucial key to success still lies in a super hot smoking wok, a large open flame and a very quick hand. Sorry but it has to be a wok and it has to be a flame; an electric stove and a normal Tefal or any other frying pan just won't provide the essential smoky "wok hei" (the fragrance imparted by a hot wok)- trust me, I've tried. You must also:

a)Make sure all the individual ingredients are already sliced/ washed/ chopped/ prepped before you start any cooking, ready to be tossed in fast-and-furious style. Too slow and stuff will burn!

b)Ventilate- put your cooker hood on at full blast, open all your windows etc to avoid setting off your smoke alarm (which I've done several times).

c)Use fresh hor fun/kuay teow where possible. As they usually come quite stiff and stuck together, make sure to soak in boiling water first to loosen the strands (don't just try to pry them apart as they will break). If you only have dried noodles, use less as it expands once boiled and cook according to the packet instructions first.

d)Make sure to drain the soaked hor fun/kuay teow thoroughly. Wet noodles beget soggy char kuay teow that won't char!

e)Fry single portions at a time to get the right texture and ratio of noodles to the other ingredients.

f)Put aside any concerns about healthy eating- if you're on a diet, char kuay teow and it's tasty lardy deliciousness are NOT for you :)

g)Be prepared for your entire house to smell like a hawker centre. I'd recommend closing off your bedrooms/any other areas you'd like to protect.

Happy cooking!

Penang Char Kuay Teow (Stir-Fried Flat Rice Noodles)
*Makes 2 medium servings*

  • Pre-preparation
Soak 300g fresh hor fun/kuay teow in boiling water until noodles are softened and separated (if using dried noodles, cook according to the packet instructions first). Drain until as dry as possible using a colander or sieve.

Stir together 3 tbsp dark soy sauce, 1 tbsp light soy sauce and 1/2 tbsp sugar in a small bowl to form the seasoning sauce and set aside.

Finely chop 2 cloves of garlic.

Peel, devein and wash 8-10 medium prawns.

Thinly slice about 75g fishcake and 1/2 a stick of lap cheong (Chinese sweet dried sausages) into 8-10 pieces each. Some people use char siew (barbecued pork) or shredded crab meat too- do whatever you fancy.

Slice the green part of 2 stalks of ku chye (Chinese chives) into short lengths (roughly 3cm). Or if you don't have any, use spring onions instead like I did.

Rinse 2 small handfuls of beansprouts. (Tip: once you've opened a pack of beansprouts, store them soaked in cold water in the fridge. For some reason they'll last a few days longer that way!)

Place 2 eggs, your white pepper, your salt and your jar of chilli oil with shrimp within easy reach.

I'm not a fan at all but if you're really hardcore/can even find them, scrub a handful of si hum (blood cockles) until clean, blanch them quickly in boiling water to open then deshell them.

You are now ready to "char"!
  • Frying the Char Kuay Teow
Heat 2 tbsp of oil (or lard for a more authentic albeit more detrimental version) in a large wok over high heat until smoking.

Throw in the rest of the ingredients in the following order and fry briskly:

Half the pre-chopped garlic (1 clove)
4-5 prawns
4-5 slices each of the fishcake, lap cheong or char siew
1 heaped tbsp chilli oil with shrimps- get lots of bits not just the oil, and be prepared to start coughing as everything smokes up! Most people use normal chilli paste/sambal but I really favour the added kick and depth of shrimpy chilli oil.
Half the drained hor fun/kuay teow (should be about a large handful)
2 tbsp of prepared soy sauce-sugar seasoning
Dash of white pepper
Dash of salt

Push the noodles to the sides of the wok and break 1 egg into the middle. Scramble quickly and toss to mix.

Chuck in a small handful of fresh beansprouts.

Throw in half the sliced Chinese chive/spring onion strips.

Give everything a good last few tosses, then dish out onto a plate. Repeat the entire process with the remaining ingredients.

Serve immediately.

Tuesday, 21 September 2010

Dark Chocolate Banana Fudge Cake


Moist and dense with a deliciously crusty top, this easy-peasy fudgey concoction features not only the classic pairing of chocolate and banana, but the added rustic bite of roughly chopped nuts.

If you prefer making it in brownie form, feel free to double the recipe and use a larger rectangular pan. Yummy served slightly warm on its own, or with a scoop of ice cream.

Dark Chocolate and Banana Fudge Cake
Makes a small 8" round cake

Melt together and let cool:
100g dark chocolate, chopped
100g butter
150g sugar

*I do this by microwaving at 20 second intervals, stirring in between- feel free to use the more traditional bain-marie/double boiler method if you prefer.

Stir in:
2 small eggs (or 1 large egg), beaten
1 ripe banana, mashed
A handful of nuts, roughly chopped (I like walnuts/pecans but use whatever you like)

Sift and fold in:
50g self-raising flour
1/2 tsp baking powder
1 tbsp cocoa powder

Pour into an 8" round cake tin lined with greaseproof paper and bake at 160C fan-assisted (180C without) for about 30 mins or until firm.

Let cool until slightly warm before slicing.


Saturday, 4 September 2010

Spiral Curry Puffs (Epok-Epok/Karipap Pusing)

SAM TAN'S KITCHEN HAS MOVED! Please visit the new website/online store at www.samtanskitchen.com. You can also follow Sam on InstagramFacebook and Twitter. Thank you!


Crispy and golden on the outside with a spicy savoury potato filling, this scrumptious Malaysian snack is sort of a cross between a samosa and an empanada and is usually found sold freshly fried at roadside stalls. Some versions don't bother with the spiral crust, but I can assure you it adds a delectable flaky crunch that completely elevates this traditional teatime treat to another level.

The recipe below is easy though a little tedious with the multiple steps, but creates a pastry that stays crispy even when the puffs have cooled down. Form them as large or small as required- they also freeze well, so make ahead of time and fry straight from frozen when needed.

Spiral Curry Puffs (Epok-Epok/Karipap Pusing)
Makes about 30 small puffs


Firstly, The Two Doughs You Need For Spiralling


  • Water dough
Combine and knead with your fingers until soft, pliable and non-sticky (or if you prefer, use a dough hook attachment on an electric mixer like I did, then finish off by hand):
300g flour
½ tsp salt
½ cup lukewarm water
1 small beaten egg
1 tbsp of oil

Divide and roll into two equal balls, then cover (otherwise it will dry out) and leave to rest for 30 mins.
  • Grease dough
Knead 75g softened butter into 150g flour until shiny and smooth (I used to do the shortcrust pastry thing by cutting in cold butter cubes, but I've discovered room temperature butter actually works much better!). Divide and roll into two equal balls.
Water dough on the left, grease dough on the right

Next, The Potato Curry Filling


Finely chop and saute over medium heat until fragrant:
1 large onion
2 garlic cloves
2 dried chillies, soaked (omit if you don't want it spicy)


Add:
2 tbsp good curry powder (I like Baba's)
2-3 large potatoes, cut into small cubes
Salt and sugar to taste
About 1 cup water
Optional: a sprinkling of curry leaves if you have it

Simmer, stirring occasionally until all moisture is absorbed and potatoes are tender. Leave to cool thoroughly before using.

Assembling the Curry Puffs: A Step-by-Step Picture Guide

Enclose one ball of grease dough neatly in a ball of water dough.


On a lightly floured surface, roll out into a very thin oval with a rolling pin,
then roll up tightly from one end to the other like a Swiss roll.
Turn the rolled up tube 90 degrees (so one end faces you) and repeat the previous step- flatten it thinly again lengthwise into a long oval , then roll up tightly like a Swiss roll.

With a sharp knife, slice into 1cm discs (or thicker if making larger puffs).
The spiral layers should be clearly visible.


Flatten each disc into a thin circle with a rolling pin (as thin as
you can get it without the layers splitting apart).


Place the rolled out pastry onto a curry puff mould (or use your palm if you don't have one).
Fill with just enough potato curry in the middle- not too much or it will burst!


Fold the mould over carefully to enclose, peeling off any excess pastry from the sides.
If you prefer to crimp manually, pinch the edges flat and fold in at
a 45 degree angle to form a rope as pictured.

The assembled curry puffs- one manually crimped, one made with a mould behind it


Deep fry in hot oil over medium-high heat, tossing continuously until golden brown.
Remove with a pair of wooden chopsticks or a slotted spoon, shake off excess oil
and drain on kitchen towels before serving.

Enjoy!