Thursday, 29 April 2010

Sambal (Malaysian Chilli Paste)

SAM TAN'S KITCHEN HAS MOVED! Please visit the new website/online store at www.samtanskitchen.com. You can also follow Sam on InstagramFacebook and Twitter. Thank you!


The quintessential Malaysian condiment, sambal is a deeply fragrant, spicy and sweet chilli paste with the added kick of dried shrimp paste that Malaysians chuck on just about everything.

Be it to stir fry vegetables like aubergines, okra or kangkung (water morning glory/water spinach), to intensify meat and fish dishes or as an accompaniment to our favourite hawker staples like nasi lemak, curry laksa, Hokkien mee and prawn mee, sambal is insanely versatile and characterises the Malaysian addiction to all things hot and tasty. A million different "authentic" versions abound depending on who you ask, but after much experimentation I've found that the recipe below is the closest thing to the stuff we find back home.

Whilst purists will insist you can only make a decent version with the traditional pestle and mortar, I see no point in wasting the convenience of my electric blender and have thus far had no complaints :) Feel free to adjust the heat, saltiness or sweetness as desired.

Sambal (Malaysian Chilli Paste)
Makes about 1 1/2 cups


Firstly, deseed about 50g-100g dried chillies (basically a big handful, depends on the heat you want) by tearing them in half and letting the seeds fall out. Don't worry if you leave a few in, but shake most of them out or you'll burn your tongue off!

Boil the chillies for 30-45 mins to further reduce the heat. Drain off the liquid and let cool.

Blend to a fine paste:
The prepared chillies above
15 shallots (the tiny red Asian type) or 3 medium cooking onions
20 cloves of garlic
A small handful of whole dried anchovies
1 tsp belacan (dried shrimp paste)


Heat a generous amount of oil in a saucepan or wok, and fry the blended paste over medium-high heat for 10 mins or so until the oil separates (by this, I mean until the paste thickens and visible trace amounts of oil seep from the sides and "separates" from the bulk. This is a crucial step to make sure the spices are fried thoroughly enough and all the moisture is evaporated).

Add and cook a further 5 mins until a darker red:
1/4 cup asam jawa (tamarind juice- soak a large chunk of tamarind pulp in hot water, stir, then strain through a sieve and discard the seeds)
1/3 cup gula melaka (coconut palm sugar) or dark brown sugar
Salt to taste

Let cool completely before using. Stir in whole crispy fried anchovies to make it sambal ikan bilis, serve alongside nasi lemak or any other rice/noodle dish, or use to stir fry vegetables, seafood or meat.

Store in a container in the fridge, or freeze for later use.


Wednesday, 28 April 2010

Ben & Jerry's Annual Free Cone Day

Once every year, Ben & Jerry's outlets all around the globe do THIS:


That's right, free handouts of their delicious ice-cream to one and all just as a show of thanks to all their fans, no strings attached other than a time limit (usually 1pm-5pm) and a couple of charity collection boxes you can pop some change into if you want.


Once every year, the cheapskate foodie in me squeals in delight and joins the other hardcore I Screamers who queue up, get a free scoop, eat it, queue up, get a different flavour, eat it, queue up etc again and again until we can bear the luscious creamy goodness no more. This year our scoop shop of choice was Greenwich, where the crowd was so small (compared to my previous experiences of Leicester Square) that Arivind and I managed to polish off 4 scoops each in quick succession before people even started gathering, with barely time in between to decide on what flavour we wanted next before it was our turn again.

If you've never been to/weren't aware of Free Cone Day (or Free (Fair) Cone Day as it was this year with their commitment to going 100% Fairtrade), it's been happening since 1978 and will continue to happen every April for the foreseeable future so mark your diaries now :)

Thank you Mr Ben, thank you Mr Jerry, your annual show of generosity makes this food blogger one happy bunny.


Sunday, 25 April 2010

The Mini Sam Tan Kitchen Turns One! :)


I can hardly believe it, but today marks one whole year since I jumped on the blogger bandwagon and wrote my first post, and then sharing the excitement of having mastered Char Kuay Teow.

60 posts and 45, 000 hits later (thank you to all the foodies out there who have visited this blog!), here it still stands for me to trade recipes, restaurant reviews and general gourmet passions with all the gluttons and gastronomes out there.

Thank you all for reading and supporting The Mini Sam Tan Kitchen, and here's to many more years to come! :)

Hugs and chocolate brownies,
Sam Tan

Saturday, 24 April 2010

Dry Fried Spiced Minced Lamb


Made this up as a spur-of-the-moment dinner a couple of nights ago with a pack of discounted lamb mince bought for cheap from our supermarket's reduced-to-clear shelf- no snobbery in this household when it comes to meat, we survive on hoarding near-expired packs and freezing them:)

After a few minutes staring at my cupboard wondering what to chuck in with it, I settled on a few random spices, leftover raisins and a generous sprinkling of toasted coconut- the warmth and aroma of ground spices just elevates everything to a whole different level, and dried fruit is the perfect complement for lamb (particularly mince) both in flavour and texture.

As per usual, feel free to chop and change with sultanas, dried apricots, nuts or whatever floats your boat.

Dry Fried Spiced Minced Lamb
Serves 2-3 alongside rice

Brown over high heat without oil (lamb is quite fatty):
400g minced lamb
1 large onion, sliced into half rings
Few cloves garlic
Few dried chillies, crushed
1 kaffir lime leaf, cut into thin strips

Stir in:
1 tsp garam masala
1/2 tsp cumin
1/2 tsp ground coriander
Salt and pepper to taste
Generous handful of raisins
Generous handful of dessicated coconut, toasted

Stir fry until dry. Serve with rice.

Rasa Sayang Revisited


Wed 21 April 2010

Following this very unflattering review, I am heartened to say that instead of just pacifying me with a gift voucher or something along those lines, I was contacted by the manager Fee Bee Chong with an apology and invited back to dine personally with her and the two proprietors of Rasa Sayang (Ellen Chew from Singapore and Teddy Chen from Malaysia) so they could gain honest feedback face-to-face.

In what turned out to be a very productive and insightful evening, it emerged that they have since introduced more training sessions to improve what they know is a serious recurring problem with their service staff. I did not ask nor did they mention what directly happened with Ms Fungal Infection, but seeing as they had CCTV footage to go on (news to me- many Chinatown restaurants apparently have them) I trust they identified and dealt accordingly with the correct person.

In terms of their menu it also seems to be a continued aim (and challenge) to meet both Malaysian and Singaporean expectations of what constitutes "authentic" versions of our cuisine, the startling differences of which to date I had been unaware of (being a Malaysian who has only ever stepped foot in Singapore once). For instance, Singaporean Hokkien Mee refers to a white, non-soupy version of what Malaysians call Penang Prawn Mee, whereas Malaysian Hokkien Mee will no doubt shock Singaporeans with its fat udon-like noodles stir-fried in a thick black sauce and crispy rendered pork fat. I also learnt that the sweet Mee Goreng which my partner and I were so appalled at (as Malaysians used to a spicy, robust mamak style) is what Singaporeans would call accurate, that Singaporean Char Kuay Teow is wetter with none of the smoky charred characteristics we deem essential and so on.

The sense I get is that labelling itself both a Malaysian AND Singaporean restaurant may be in itself contradictory, the inherent obstacle responsible for Rasa Sayang's hit-and-miss menu as far as a Malaysian is concerned. One thinks that perhaps they would benefit from choosing one style and sticking with it, rather than risking a compromise and pleasing neither.

It is only right however that I give credit where its due to the other dishes I got to sample on this return visit. As a hardcore Hainanese Chicken Rice fan I thoroughly approve of their new improved version (it is thankfully a dish that Singaporeans pride themselves on and isn't wildly different from what Malaysians like), and the chef's handmade taufu starter also impressed, deep-fried until crispy with a soft silky interior and a sweet sour mango sauce. Indian rojak was of an acceptable standard, though I found the other starter of otak-otak (spicy fish mousse in banana leaf) rather tiny and far too firm. To round off the mains, the admittedly Anglicised version of Nasi Goreng (to give Western tastebuds an easy introduction) was still tasty and enjoyed by my Malaysian friend, particularly the meaty sticks of satay that accompanied it.

To its advantage, Rasa Sayang's dessert menu is far larger and more varied compared to other Malaysian joints in the area. We enjoyed the warm bubur pulut hitam (black glutinous rice), though we found the handmade cendol and sago gula melaka (tapioca pearl pudding in coconut milk and coconut palm sugar) rather small in portion and slightly odd in flavour- perhaps Singaporean palm sugar is different? The rest of the menu offers intriguing one-of-a-kind items such as roti bakar with homemade kaya (toast sandwich with coconut jam- see my recipe/description here), Milo Dinosaur (Milo= a much-loved chocolate malt drink, Dinosaur= an ice-blended frozen smoothie topped with extra Milo powder) and kuih ketayap (pandan crepe filled with toasted caramelised coconut), which looked good in the pictures though I cannot yet personally attest to how good they are.

The juggling act between fulfilling Malaysian and Singaporean tastes is a challenge I don't envy, and whilst the food may not be firing on all cylinders (in my biased Malaysian opinion) I do applaud their open mind in accepting customer insight and the efforts they have put in thus far to improve. Upcoming plans include a 15-item taster menu for those unfamiliar with the cuisine, as well as offering the uniquely Malaysian/Singaporean yee sang during Chinese New Year (a salad of shredded vegetables, crisp crackers and fish that is tossed high to symbolise prosperity and health). It is a fairly new establishment after all, and given their constructive attitude I look forward to seeing where it goes from here.

Monday, 5 April 2010

Blueberry Cheesecake

*Also available under Baked Goods to Order at £20 per cake*

This cake is essentially a scaled-down version of the Baked New York Cheesecake recipe which I posted last May, with the added crowning glory of homemade blueberry topping. If you prefer a thicker, taller cheesecake you can by all means stick to the full recipe by clicking the link above- I personally felt the original was too much cake in comparison to the amount of fruit, and have thus reduced it to the proportions below.

I will be honest with you, if you have never baked a cheesecake before in your life you may find it rather fiddly and time-consuming: all the ingredients need to be mixed carefully, then baked slowly in a moist oven, then cooled gently, then refrigerated for at least 12 hours before the cheesecake can be eaten. They are also prone to cracking down the middle, though you needn't worry in this case as the blueberries will safely hide any craters or imperfections that may occur :)

Blueberry Cheesecake

The Cake Part

Before you begin:
  • Firstly bring all the ingredients to room temperature before starting (takes roughly half an hour from refrigeration).
  • Line the base of an 8" loose-bottomed/springform cake pan with greaseproof paper. DO NOT attempt to use a normal cake pan as it will be impossible to remove.
  • Preheat your oven to 150 C (140C fan assisted). Create a moist oven by placing a shallow tray of hot water on the bottom rack.
The base:

Crush together (I find the easiest way is to place in a bowl and pound with the bottom of a heavy pint glass) and press tightly into the base of the lined cake pan:
175g (6oz) digestives (about 13 biscuits)
50g butter, melted
Handful of oats (optional)

The cake:

*Make sure all ingredients are at room temperature and be careful not to overmix*

Beat 400g full fat soft cheese (also called cream cheese) on low with an electric whisk until soft.

Combine and beat in on the lowest speed possible until just combined:
100g (4oz) caster sugar
2 tbsp flour
Pinch of salt

Fold in gently until just combined:
2 large eggs, beaten- add one by one
200ml sour cream
1 tsp vanilla extract
Finely grated zest of 1 orange/lemon (I use a bit from both)

Pour batter into pan over digestive base. To remove air bubbles, lift and knock the pan down onto the counter firmly a few times, and run a butter knife through in an “S” pattern.

Place the cake on the rack above the tray of water and bake for about 75 mins. DO NOT open the oven whilst cake is baking. Cheesecake is done when the edges are puffy and only a small spot in the center (about 1" in diameter) still jiggles. DO NOT bother testing with a skewer or toothpick like a regular cake, as it will not come out clean.

Leave to cool in a warm place (remove from the oven and cover the pan with a bowl, or turn off the oven and leave it inside with door slightly ajar). After 10 mins, scrape around the edges with a thin spatula to ensure the cake doesn't leave a residual skin on the sides as it shrinks and tears away whilst cooling. Return it to its warm place to cool completely in the pan, then refrigerate the cake for at least 12 hours (preferably overnight) until cold and firm.

To remove the cake from a loose-bottomed pan, place the pan on top of a large can or jar and pull the sides downwards. Remove the pan bottom by sliding a spatula under the digestive base and pushing the cake carefully onto a serving plate.

Blueberry Topping

Combine in a small pot and cook over medium heat until sugar dissolves and the berries soften:
300g fresh blueberries
1/2 cup sugar
Juice of ½ a lemon

Mix to a paste, stir in and cook until thick:
2 tsp cornstarch
Bit of water

Let cool, then spread evenly on top of cheesecake and refrigerate to let topping firm up slightly.

The cake tastes best at room temperature. Slice with a hot knife and enjoy!

Friday, 2 April 2010

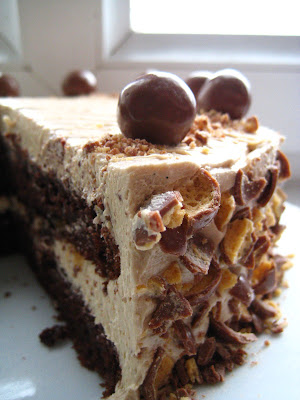
Malteser Gateau

*Also available under Baked Goods to Order at £30 per cake*


I made this as a bit of an experiment last night for Arivind's 27th birthday today- judging from the fact that the entire cake was demolished in less than 12 hours (between 3 people, although for the most part by him), I'd gather the experiment was quite a success :)

The recipe below produces a very soft and moist bittersweet cocoa sponge that doesn't taste remarkable on its own, but pairs deliciously with the sweet-salty malt buttercream frosting to create an irresistible mouthful. On another occasion I may experiment further to try bringing out a stronger malt flavour in the sponge- for today though, it's already sitting happily in our tummies regardless :)

Malteser Gateau
Makes one double-layer 8" cake


Cocoa Sponge:

Whisk together until smooth:
2/3 cup Horlicks, dissolved in 2/3 cup milk
2/3 cup vegetable oil
2 large eggs

Sift in and fold until well-combined:
1½ cups plain flour
½ cup sugar (or more if you prefer it sweeter)
½ cup cocoa
1 tsp baking soda
1 tsp baking powder
½ tsp salt

Add in and whisk until creamy:
150ml (about 2/3 cup) sour cream
1 tsp vanilla

Divide the batter equally into two lined 8" round sandwich cake pans and bake at 175C (about 160 C fan-assisted) for 20-25 mins until firm to touch. Let cool thoroughly before frosting.

Frosting:

Combine in a large bowl and whip on high with an electric whisk for 3 mins until light and fluffy:
200g butter, softened
1½ cups icing sugar
½ cup Horlicks
½ cup milk, room temperature
1 tsp cocoa powder
1 tsp vanilla extract
Pinch of salt

If the cakes have risen to a domed shape, slice the tops off with a large thin knife to create a level surface. Place one layer of the sponge on a cake board/large dinner plate and spread about 1/3 of the frosting evenly across with a thin spatula. Top with the second layer of sponge, uneven sliced side down (so that the top of the cake is smooth and easier to coat) then spread the rest of the frosting evenly across the top and sides.

Decorate as desired and keep refrigerated- if you use chopped Maltesers as I did, please note that they become soft and chewy once the malt centre has been exposed for too long so serve the cake immediately if you want the crunch. Otherwise just let them turn gooey- it's still pretty and delicious :)

Enjoy!